Guide entry section:
Image:
Guide Entry Text:
You've now made your own ExplainerGIFs! YAY!
In order to make ExplainerGIFs the best they can be, we'll need to optimize them. This means looking closely at the settings that make them work.
Below I will take you through an experiment that uses the settings of GIF Brewery to create the perfect ExplainerGIF.
Our Focus - Rain Forests and Rain Shadows
I'm a bit of a weather geek. I love learning about the weather, and living in Seattle, there is plenty of weather to watch.
Recently, we went out to the Washington State coast, the home of temperate rainforests that stretch up into British Columbia. These forests get a LOT of rain and I set out to understand why. After learning the basics, I realized that an ExplainerGIF could be the easiest way to capture and share what I learned quickly. So, I created one:
poster image:
Guide Entry Text:
A few things to notice about the ExplainerGIF above:
- It's 15 seconds long
- It relates an idea in an understandable way
- File size = 136kbs
In the world of ExplainerGIFs, that's pretty good. Below I will take you through all the decisions that went into making this GIF work.
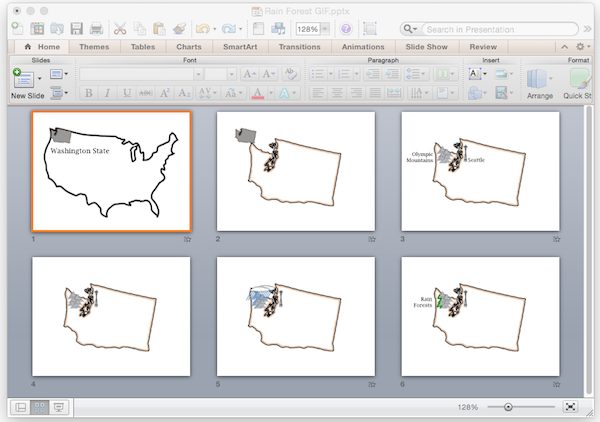
PowerPoint
The animation uses Common Craft Cut-outs, which are usually simple and low color images. I started by laying out all the images on PowerPoint slides and experimenting with animations. I used six total slides. It's helpful to use multiple slides so that the animation settings don't get too complicated. In this example, five out of six slides included the state outline as the base image.
Screenflow
For this ExplainerGIF, I used Screenflow. Once I got the animation timing down in PowerPoint, I asked Screenflow to record everything on my screen. Then I displayed the PowerPoint slides full screen. This created a video of the animation.
Once the recording was done, it was time to edit the footage to make it as short as possible.
Above, you can see that I split the footage into five sections and sped up the last two clips (notice the rabbit icons). Once the footage was playing well in Screenflow, I saved the file. Then I exported the footage to create a file that could be converted into a GIF.
Here are the export settings I used in Screenflow:

Notice the Preset is "Web - Low" and that I've scaled the video down to 30% of it's original size. These are important for reducing the size of the file that will create the ExplainerGIF. Once the video file is exported and saved on my computer, I open GIF Brewery.
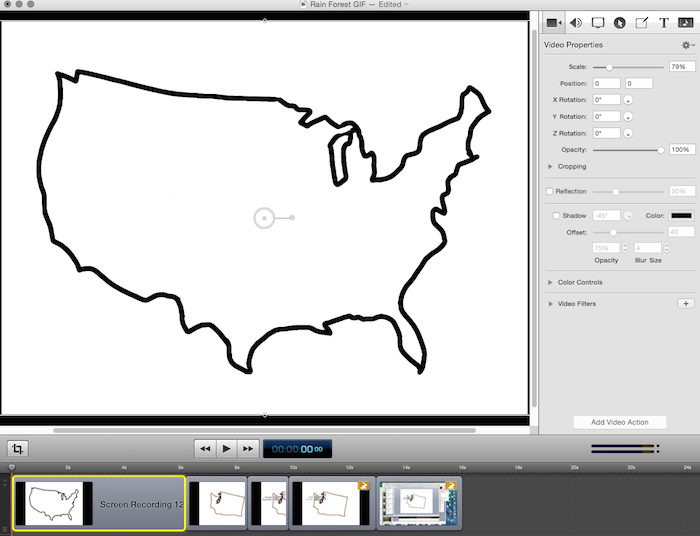
GIF Brewery
To start this process, I open the exported video inside GIF Brewery. The video shows up inside the GIF Brewery window. From here, there are a number of controls that enable you to manage the GIF it creates. Keep in mind that many of the options discussed below are also available in other tools.
The simplest options are on the main menu. They are Crop and Resize. These options can help you reduce the dimensions of the GIF and make it smaller.

Next we'll look at fine-tuning options that can make a big difference in file size. These options are available in "GIF Properties". Below is a screenshot of the options I used to create the GIF above. The biggest changes are outlined in Orange.

Frame Rate and Automatic Settings
I have found that the best way to use GIF Brewery is through the "Automatically Calculate Count and Delay" option. When this option is selected, you can change the frame rate. For ExplainerGIFs, you can reduce the frame rate (and file size) significantly. The default is 30 frames per second (fps), but I recommend between five and ten fps. If you use too few frames, this GIF will look choppy.
Color
Color is another change that impacts file size. As we've discussed, GIFs can handle up to 256 colors. But we don't need that many for ExplainerGIFs. The GIF Brewery default is 48 colors, but I've reduced it to 24 and that made the file smaller. I tried 16 colors, but that change interfered with the color of the rain (blue) and rainforest (green). If your GIF is only a couple of colors, you may be able to use grayscale or black-and-white options.
To Test, Save the GIF
Simply click "Create GIF" to see the impact your changes. There are a few things to look for...

File Size: GIF Brewery will immediately display the file size of the GIF. Your goal is for the GIF to be under 250kbs. This is simply a rule of thumb - the file size really depends on how you plan to use the GIF.
Playback: Are the animations stuttering and jerky? If so, there are too few frames per second.
Color: Are any colors off? If so, you may need to increase the number of colors available.
Once you have everything set, you can simply save the GIF on your computer and it's ready to share.
This guide is brought to you by the Explainer Academy
Develop powerful explanation skills and learn to create Common Craft Style videos via online courses. Learn more.